Contents
A cement pond gives you total control over how you want to build your pond. The only limitations are your imagination and your budget. Building a cement pond can be rather expensive and most people are better off choosing to build a pond using pond liner. This is especially true if you want to build a small natural pond.
Let’s start by looking at the benefits and drawbacks of cement ponds.
Benefits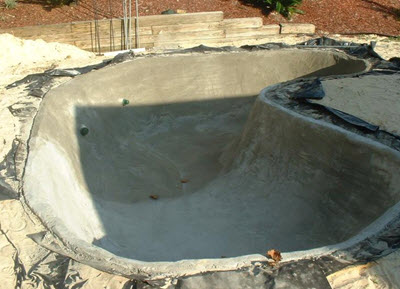
- Complete control over the design. Can include natural rock.
- Durable and easy to clean
- Long lifespan.
- Can be built near or inside buildings.
- Can be used for any sized pond.
- Allows for viewing windows to be installed.
Drawbacks
- Expensive
- Large carbon footprint
- Labour intensive
- Takes a lot of work to make it look natural
The benefits and drawbacks listed above are just some of the benefits and drawbacks associated with cement ponds. It is not a complete list.
Choose your location
The first things you need to do when you want to build a cement pond is to decide where you want to put it. Cement ponds are the best option if you want to place a pond close to your house. Something I generally recommend against.
You can read more about what to think about when choosing where to build your pond here.
Designing your pond
Building a cement pond gives you complete freedom to design it to look exactly as you want it to look. You can add different depths, caves and other features as you see fit. Spend a lot of time designing the pond so that you know exactly what you want before you start building. It can be a lot of work to change something later if you decide that you do not like it the way you built it. Make sure to build it the right way the first time.
Do not forget to include tubes for filtration in the design. They will need to be put in their place before you pour the cement.
Mark out the pond
Once you designed the pond you are ready to mark the pond out where you want to build it. I recommend using spray paint to paint the borders on the ground. Always mark the outer border on the pond. Not the inner border. The outer border allows space for the cement, not just the area that is going to be filled with water.
It can be a good idea to mark out different areas with different depths separately. This makes it easier to dig.
Digging
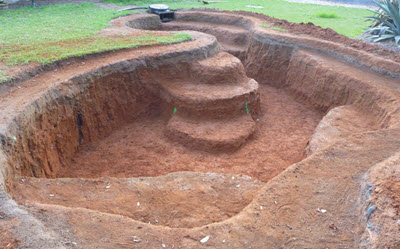 It is time to start digging once you have marked the outline of the pond on the ground and like what you see. Smaller garden ponds (most garden ponds) can be dug by hand with a pale and a wheelbarrow to transport the excess dirt away from the spot. Larger ponds might require you to rent a digger or a mini digger. Use a mini digger whenever possible. A larger digger will damage your law and garden as it moves around.
You can rent a mini digger to dig a small pond as well. This saves time. But there is no need to do so and you will save a lot of money by digging it by hand.
Depending on the soil conditions where you live, the climate and the design you might have to dig for the foundation of the pond as well.
A few examples of situations that require extra attention are:
- If your garden contains dirt that expands and contracts a lot during the year. If this is the case then you might be forced to remove extra dirt and replace it with sand to prevent that the moving dirt damages the pond.
- People who live in an area with sub freezing temperatures during the winter. This causes extra stress on the pond and you need to make sure that the pond is strong enough to handle it. Once again it is good to replace the dirt below and around the pond with sand (with some top soil for plants) make sure to drain the area to prevent that freezing water damages the pond.
- If you want to build large walls or overhangs as a part of your pool design then you need to make sure that these have good foundations that keep them from falling over as time goes by.
There are plenty of guides online that can give you more information on what you should think about in your area.
Rebar and pouring
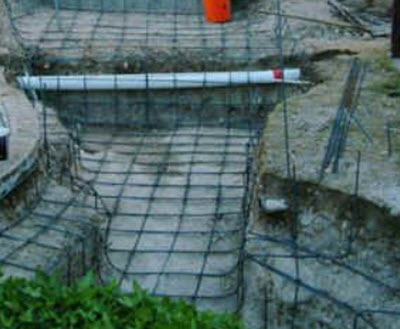 It is highly recommended to use a lot of rebar in your pond. Include rebar in both the bottom and the side of the pond. Any overhangs need to have a lot of rebar in them. The rebar helps make the pond a lot stronger and will prevent it from cracking over time. Build a mesh of rebar in the entire floor of the pond. I recommend having 3/8 rebar every 6-8 inches in both directions. Make sure to weld the rebar together.
If you plan to pour the walls then you should reinforce them with a rebar mesh as well. If you plan to use cement blocks to build the sides then you should make sure to reinforce the walls with rebar as much as possible. Exactly how to reinforce the walls depends on what type of blocks you decide to use. Do a google search to find out how to best reinforce a wall made of the type of blocks you want to use.
Once you are ready to pour it is important that you pour everything in a short amount of time. Different areas can be poured different days but always finish pouring an area you have started pouring. Never wait until the next day. Doing so will create a weak spot where the two pours meet.
If you pour the walls then you should pour them at the same time you pour the floor. The best way to be able to pour everything quickly is to order one or several cement trucks that arrives at roughly the same time. You can mix the cement yourself if you want to build a very small pond. If your pond is a little larger then it is better to order a truck with already mixed cement.
Sealing the pond
Once you have poured your cement, allowed it to cure and removed all the molds you will be left with a rough version of your finish pond. The pond will however still need a lot of work. If you leave the ponds as it is now then it is likely to leak. It is uncommon for a pond to be 100% waterproof at this point of construction.
You can now choose to either seal the pound by using a plaster designed for ponds. Adding acrylic sealant (for use with plaster and cement) in the plaster will give you a better seal. Make sure to cover every square inch of the pond with plaster and make sure that you get a good finish in every section of the pond. This includes areas that will not be visible in the finished pond.
Another alternative is to use glass fiber and resin to seal the pond. This is a better option. It will be stronger and it will provide a better seal. A cement pond with an acrylic seal will have a very long expected lifespan. The drawback of using acrylic is that it is more expensive and that it is more work. The benefit is that you can use a colored resin to get the pond to look exactly as you want it. A fiberglass resin finish makes the pond very easy to clean.
Finishing touches
Once you have finished sealing your pond you are ready to put the finishing touches on it. Place rocks and driftwood on the bottom, install the filtration, fill it with water and plant the plants. The pond needs to run for a few weeks before it is ready for fish.