Contents
A form molded plastic pond can be the easiest way to build a pond. You do not have to design your own pond. You can choose a design already created by someone else. Most plastic ponds are designed to have different depths and have areas for different types of plants.
Installing a plastic pond is incredibly easy.
Before we talk about how to install a plastic pond I want to talk a little about the benefits and drawbacks of a plastic pond.
Benefits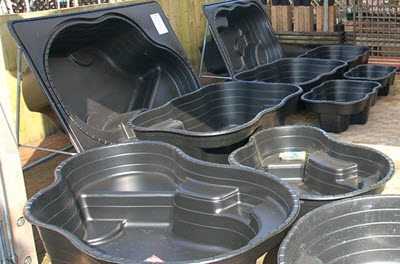
- You can buy a complete kit with everything you need
- Easy to install
- Unlikely to leak
- Durable
- Designed by pond experts.
Drawbacks
- An expensive option. It is cheaper to build your own pond from scratch.
- Bulky to transport
- You can not design it as you want it. A limited number of models to chose from.
- Not a good option for large ponds.
- Often looks artificial. Not ideal for natural ponds.
The list of benefits and drawbacks include the most important benefits and drawbacks but is not a comprehensive list of all benefits and drawbacks.
Buying a plastic pond
There are a number of different stores that sell molded plastic ponds. This includes garden centers, specialty stores, internet vendors and large supply stores like Home Depot. It is often possible to buy plastic ponds cheaper online than you can in a local store. I do despite this recommend that you buy it in a local store. There are two reasons for this. If you visit a local store then you are able to see the pond and its quality with your own eyes before you buy it. That is not possible if you buy it online.
The second reason is that they are very large and shipping can often be rather expensive. Local stores are often cheaper when considering the cost of shipping. They do sometimes get damaged in shipping. The seller will usually send you a new one but it is still a hassle to deal with.
Getting the plastic pond home
The ponds can be fragile during shipping if you are not careful. Make sure to use a vehicle that is large enough to fit the pond and make sure that there are no sharp objects that can damage the pond during transport. Transporting the pond should not be a problem as long as you take care.
Choosing the spot for the plastic pond
It is important to choose the right spot for the pond. You can read more about how to do that here.
Installing the pond
Once you have the pond at home you should place it in the spot where you want to install it. Take a good look at it. Does it look good in the spot you have chosen? To you want to change anything? If everything looks good then you should mark the edges of the plastic pond on the ground. I use a can of spray paint to do this. Once you have marked the edges it is time to move the plastic pond away from the area.
The groundwork
You should now have an empty space where the outline of the pond is marked on the ground. At this point, it is time to dig. Dig out out the shape of the pond. I recommend that you use a wheelbarrow to move the dirt from the area right away to not damage your lawn unnecessarily. 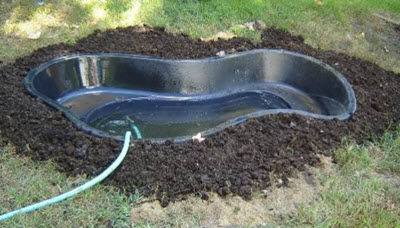 Try to dig the hole in the same shape as the pond with all the shallow and deeper areas. Dig all areas slightly deeper than the pond is.
It can be a good idea to place the pond in the hole to see where you need to dig more and where you are done. It can be very hard to get everything exactly right using just your eyes. Once the hole matches the pond (but is a little deeper) then you should use sand to fill it up a little so that the pond fits perfectly in the whole.
The thin layer of sand helps to protect the pond. This is the reason I recommend you dig a little deeper than necessary.
I recommend that you put a protective weave under the pond if you live in an area with a lot of rocks in the ground. This will help prevent damages. The protective weave is not very expensive and more than worth its price.
You are now ready to place the pond in the hole permanently.
In the pond
The pond is now installed but you are not done. You will still have work to do inside the pond. Exactly what you need to do depend on the exact model you have purchased.
If the pond has a shallow area for sump plants then you should fill this area with a heavy dirt before you add water to the pond. This will help prevent clouding in the water. If you want to place any stones or gravel on the bottom of the pond then this is the time to do it. The same is true if you want to put a pump at the bottom of the pond. (Do not turn it on until the pond is filled with water).
Once you have completed this you can fill the pond about halfway up. Fill it until water starts to flow into the shallow area. Once you have done this I recommend planting all the plants you want in the pond before you fill the pond all the way. This includes placing any water lilies in the deep part of the pond (water lilies are best grown in pots) and planting all the plants in the sump area. Once you planted the sump area you should cover the ground around the plants with a gravel. This will help keep the dirt in its spot. I prefer to use a volcanic rock for this but any inert rock will do.
Once this is done you can fill the rest of the pond and turn on the filtration. Enjoy your work and rest. Tomorrow it is time to plant the plants around the pond 😉
Do not add any fish at this point. The pond should be several weeks old before you do this.